4DSTEM
This guide covers 4DSTEM data acquisition using the Dectris Arina detector on the Spectra 300 at Stanford SNSF. 4DSTEM records a full convergent beam electron diffraction (CBED) pattern at every scan position, producing a 4-dimensional dataset (2D scan x 2D diffraction). Screenshots recorded by Guoliang Hu during training; instructions written by Sangjoon Bob Lee.
Prerequisite: Complete TEM (Spectra) column alignment and STEM (Spectra) probe correction before starting this guide.
Acronyms:
mulXY- Multifunction X/Y knobs on hand panelTEMUI- TEM User Interface (software)CBED- Convergent Beam Electron Diffraction
Overview
| Phase | Procedures | Time |
|---|---|---|
| Part 1: Detector setup | Retract CETA, initialize Arina, connect remote software | 5 min |
| Part 2: Beam configuration | Set convergence angle, apertures, camera length (optional) | 5 min |
| Part 3: Acquisition | Insert detector, acquire diffraction data | varies |
| Part 4: End session | Retract and power off the Arina detector | 2 min |
Part 1: Detector setup
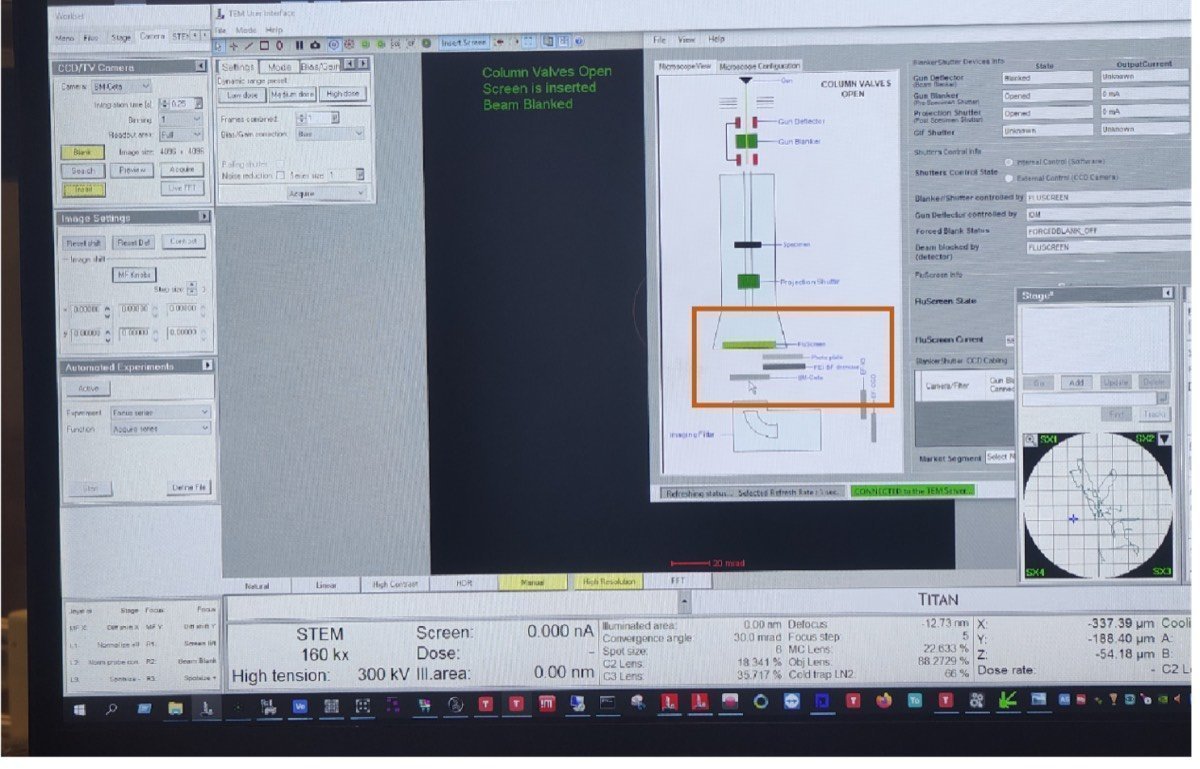
1.1 Retract CETA detector
Before inserting the Arina detector, a user must retract the CETA camera. Both detectors occupy the same physical space below the column. If the CETA is not retracted, inserting the Arina will crash both detectors. Do not skip this step.
-
On the bottom left computer, open the blanker/shutter software (red square icon with white T).
-
Click the CETA icon to retract the CETA detector.
-
Visually verify the CETA camera position is retracted from the diagram.
-
In
TEMUI, locate theSTEM Detector (User)panel and verify all detectors are retracted:- HAADF: Retracted
- BF-S (Bright Field): Retracted
- DF-S (Dark Field): Retracted
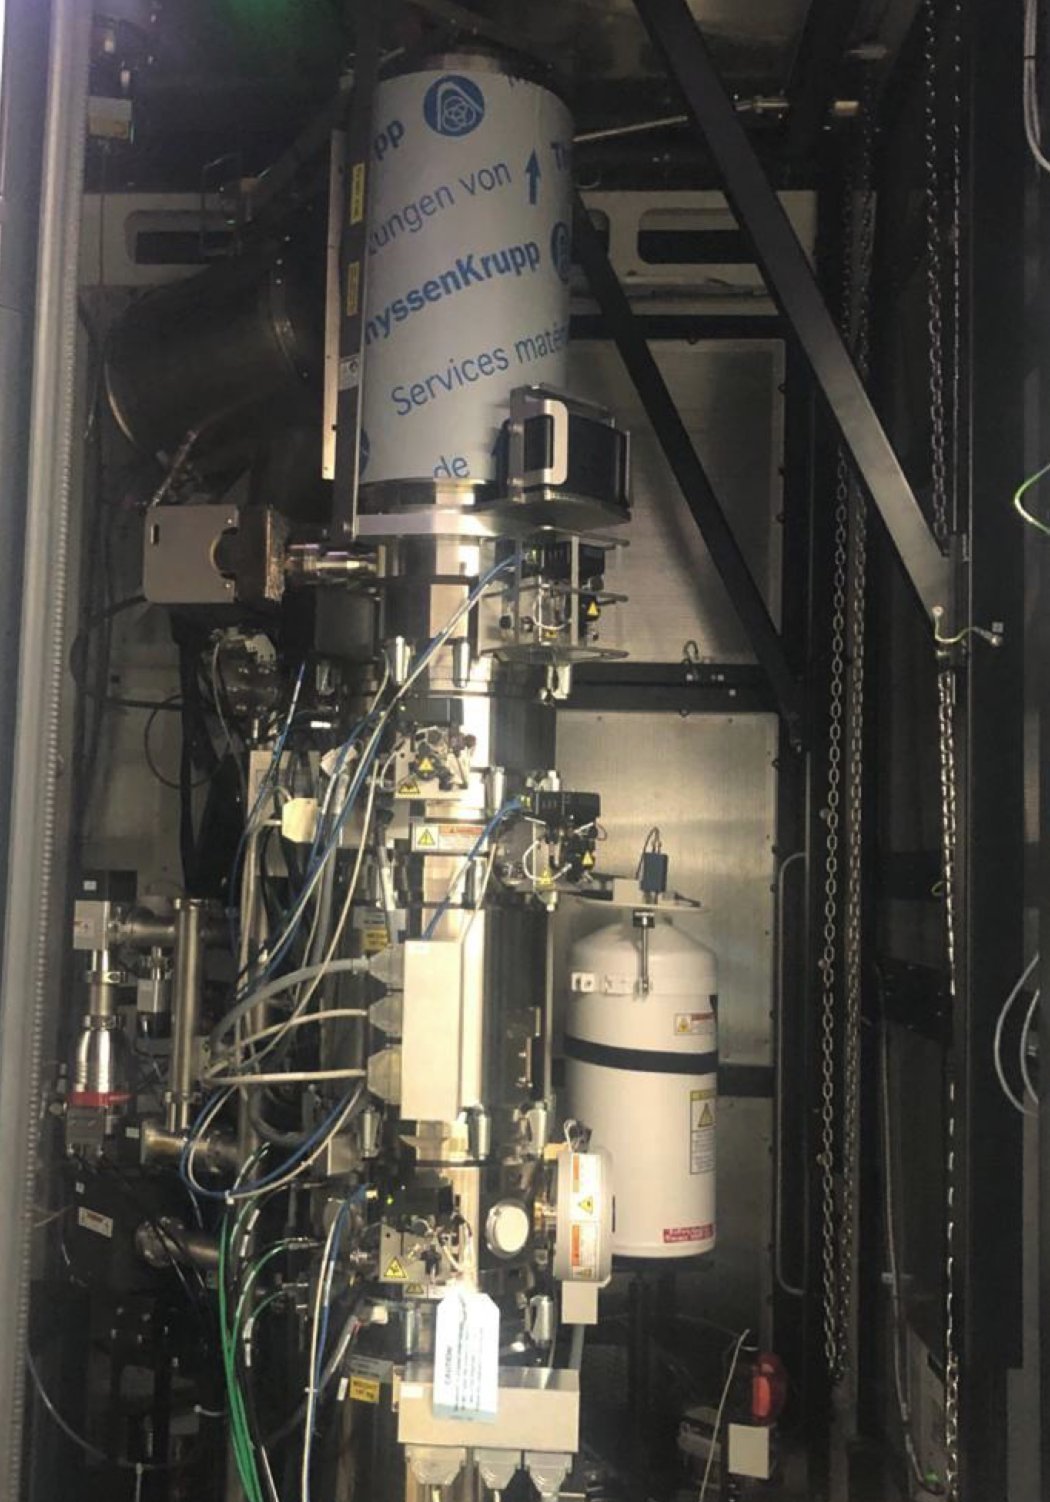
1.2 Initialize the Arina detector
-
Open the instrument enclosure on the Spectra 300.
-
Locate the Dectris Arina detector unit inside the enclosure.

-
Press and hold the button below the Arina detector (blue indicator light) for 10 seconds. When powered on, the button stays pressed in and the blue light is illuminated.
1.3 Connect remote software
-
On the control workstation, open Firefox and click the remote connection bookmark.

-
Enter the detector IP address:
192.168.12.73. -
Click
Initialize detector. Wait for initialization to complete before proceeding. The interface shows a progress bar while the detector initializes.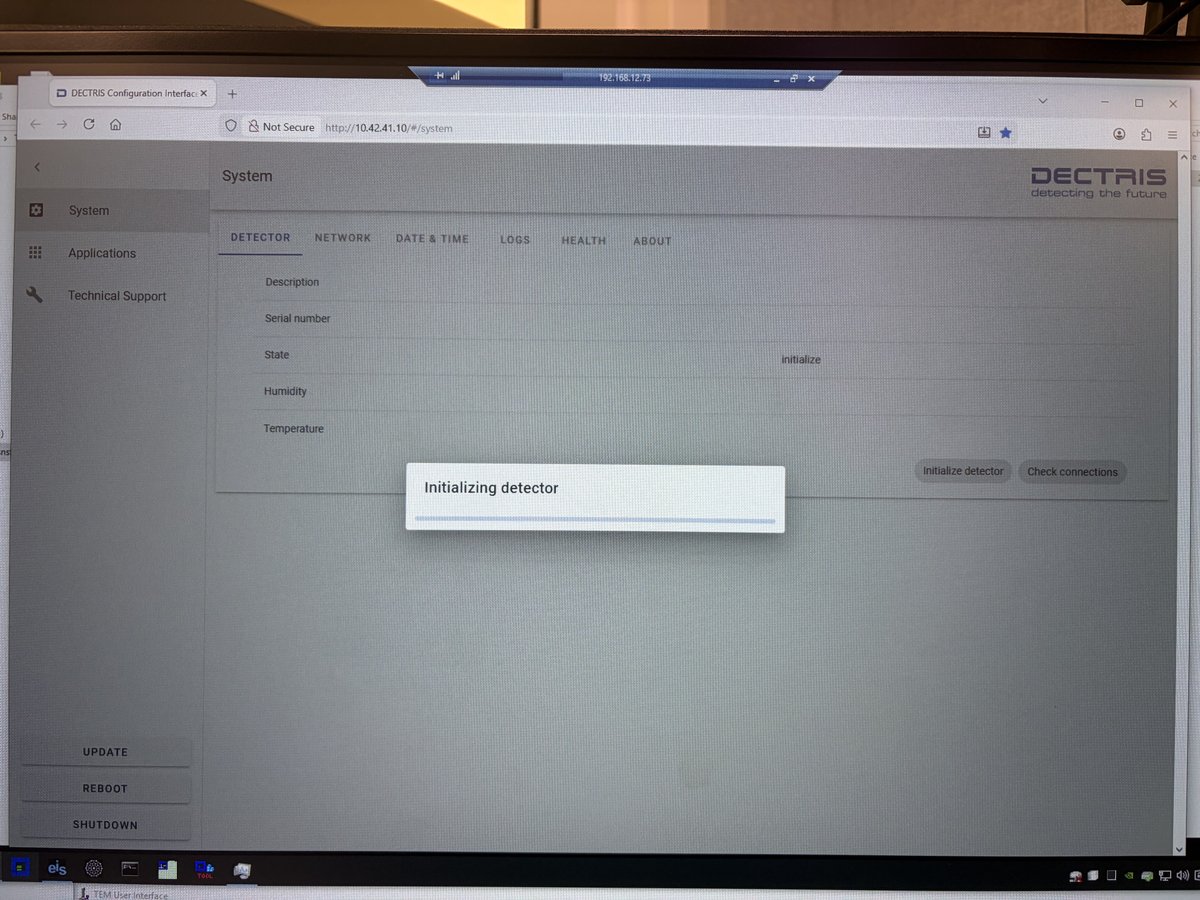
1.4 Configure file saving
-
Open the NOVENA detector software.
-
Click
Save Imagesand select the destination folder.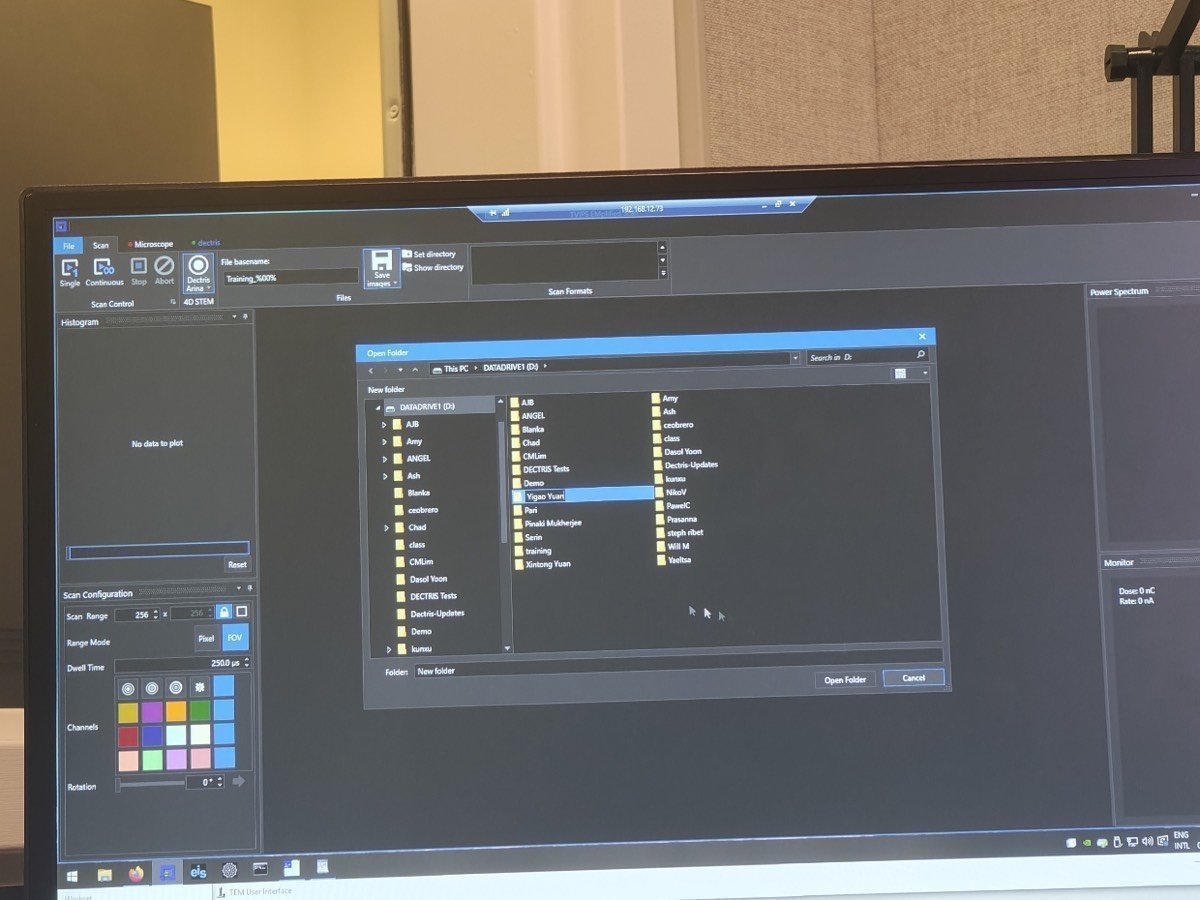
-
Set the filename format to
(name)_%00%. The%00%placeholder auto-increments the frame number. -
Use
Continuousfor live streaming (preview) andSingleto record and save a dataset.
Folder and file naming convention
A consistent naming convention saves hours of searching later when sharing data or revisiting a session months later. Use the patterns below.
Use lowercase everywhere: folder names, sample names, operator names, all tokens. Lowercase removes the question of whether a file should be
GoldorgoldorGOLD, keeps shell paths simple, and sorts cleanly.
Folder name: YYYYMMDD_{sample}_{experiment}[_{operators}]
Lead with the most important keywords: the sample first, then the experiment or focus. Adding the operators (initials or short names) at the end is optional but highly recommended: it captures who was in the room so the surrounding context (conversations, troubleshooting, follow-up questions) is easier to remember months later.
| Example | Meaning |
|---|---|
20260428_gold_drift_ptycho | Gold sample, drift study via ptychography on Apr 28, 2026 |
20260428_gold_drift_ptycho_dasol_corrie | Same session, with Dasol and Corrie noted |
20260512_mos2_ptycho_bob | MoS₂ sample, ptychography, solo session by Bob on May 12 |
File name: {voltage}_{convergence}_{scan-params}_{notes}.h5 (or .mat, .raw)
Order tokens from the largest concept (session-wide) to the smallest concept (per-scan). Voltage applies to the whole session, then convergence and camera length apply per-experiment, and scan dimensions and dwell time change per scan. Reading the filename left-to-right then reads like zooming in from the broadest setting to the most specific.
| Token | Meaning | Example | Scope |
|---|---|---|---|
{n}kev | Accelerating voltage | 300kev, 120kev | session-wide |
{n}mrad | Convergence angle | 30mrad, 1.5mrad | per-experiment |
cl{n}m | Camera length | cl0.4m, cl1.05m | per-experiment |
{n}x{n} | Scan dimensions | 128x128, 512x512 | per-scan |
{n}us | Dwell time (usually µs on Arina) | 5us, 200us | per-scan |
Only encode parameters that are constant for the whole scan. Skip things that drift or change over time (e.g., defocus): they are not informative as a fixed filename token, and there is no need to record them in the h5 metadata either.
| Example | Meaning |
|---|---|
300kev_30mrad_128x128_5us | 300 kV, 30 mrad probe, 128 by 128 scan, 5 µs per pixel |
300kev_1.5mrad_64x64_nbed | 300 kV, nanobeam diffraction at 1.5 mrad |
300kev_30mrad_256x256_drift1 | First scan in a drift series |
Stick to these patterns from the start of every session so the names sort cleanly in the file browser and stay searchable.
Part 2: Beam configuration (optional)
The STEM (Spectra) guide sets 30 mrad convergence angle by default. If that is suitable for your experiment (e.g., ptychography), skip this section and go directly to Part 3: Acquisition. If you need a different convergence angle (e.g., nanobeam diffraction), follow the steps below.
Why change the convergence angle for 4DSTEM?
The convergence angle depends on the type of 4DSTEM experiment. For ptychography, 30 mrad (the same as standard STEM) works well because overlapping disks are part of the reconstruction. For nanobeam diffraction, where separated Bragg disks are needed to index reflections, a much smaller angle is used, typically 1 to 10 mrad depending on the material and the required disk separation.
Interactive demo: Explore how convergence angle affects the CBED pattern at bobleesj.github.io/electron-microscopy-website/cbed
2.1 Enable descan
- In
TEMUI, locate theSTEM Imaging (Expert)panel and enableDescan.
2.2 Configure beam for nanobeam diffraction
The default STEM setup uses C2 = 70 and 30 mrad convergence angle. For nanobeam diffraction, reduce both to get separated Bragg disks. The table below shows typical values:
| Parameter | STEM default | Nanobeam diffraction |
|---|---|---|
| C2 aperture | 70 | 50 |
| C3 aperture | 1000 | 30 |
| Convergence angle | 30 mrad | ~10 mrad |
| Beam current | ~0.150 nA | ~0.032 nA |
| Camera length | 91 mm | 230 mm |
Why change the C2 aperture?
The C2 aperture limits the angular range of electrons entering the probe-forming optics. A smaller aperture (50 vs 70) blocks more off-axis electrons, producing a more coherent beam with cleaner diffraction patterns at each probe position. The C2 aperture size and convergence angle are proportional (approximately 7:1 ratio, e.g. C2 = 70 gives ~10 mrad).
TODO: Confirm the C2 aperture to convergence angle ratio with staff
-
In
TEMUI, go toTunetab, thenApertures. Change C2 from 70 to 50, and C3 from 1000 to 30.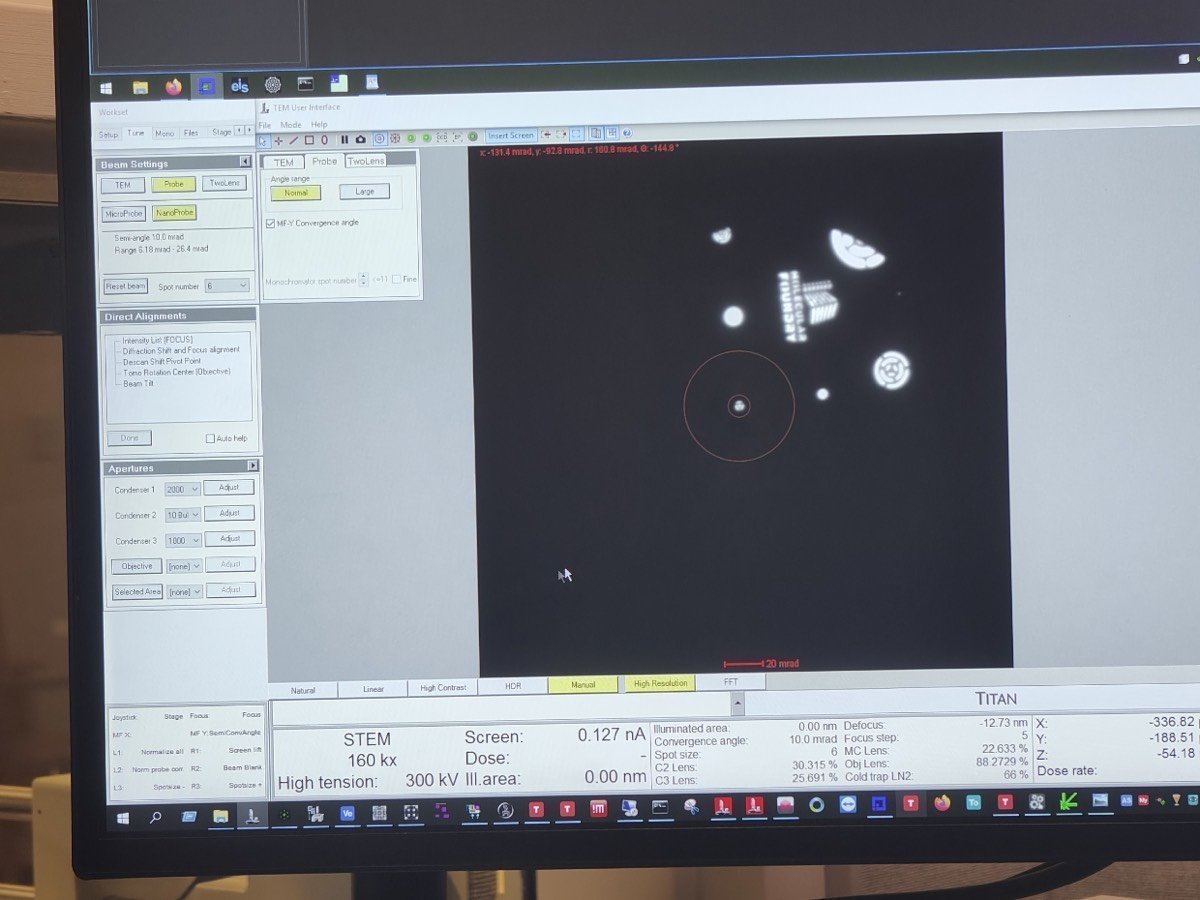
-
In
Beam Setting, clickMF-Y Convergence Angle. Use themulYknob to adjust the convergence angle to 10 mrad, then clickMF-Y Convergence Angleagain to deselect.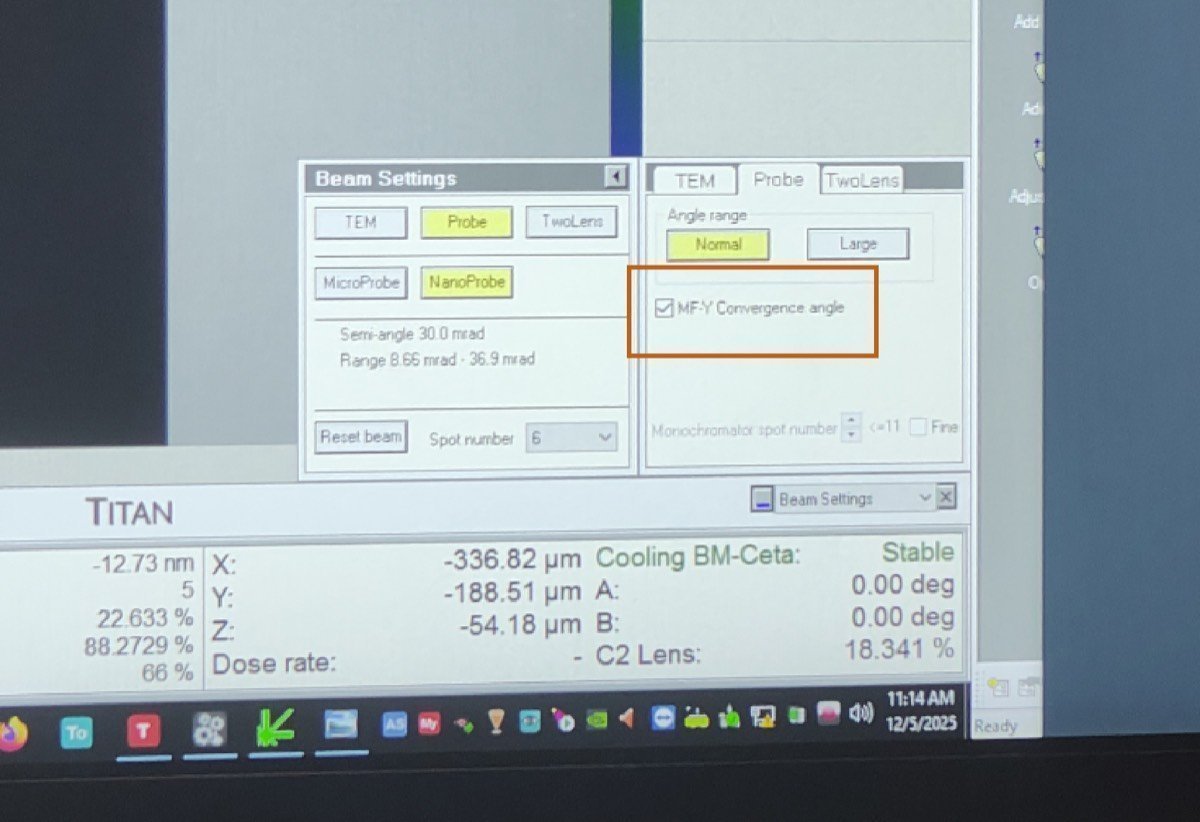
-
Adjust beam current: in
TEMUI, go toMono, clickFocus, and use the intensity knob to set the current to ~0.032 nA. -
Set the camera length to 230 mm (or 285 mm depending on the required angular range for your material).
2.5 Retract HAADF
- In
TEMUI, retract the HAADF detector. The HAADF ring would block electrons from reaching the Arina detector below.
Part 3: Acquisition
3.1 Insert detector and configure scan
-
On the Arina hand panel, press
Insertto move the detector into position. The green “Inserted” light confirms the detector is in place. -
On the scan control box, press
EDS Scan.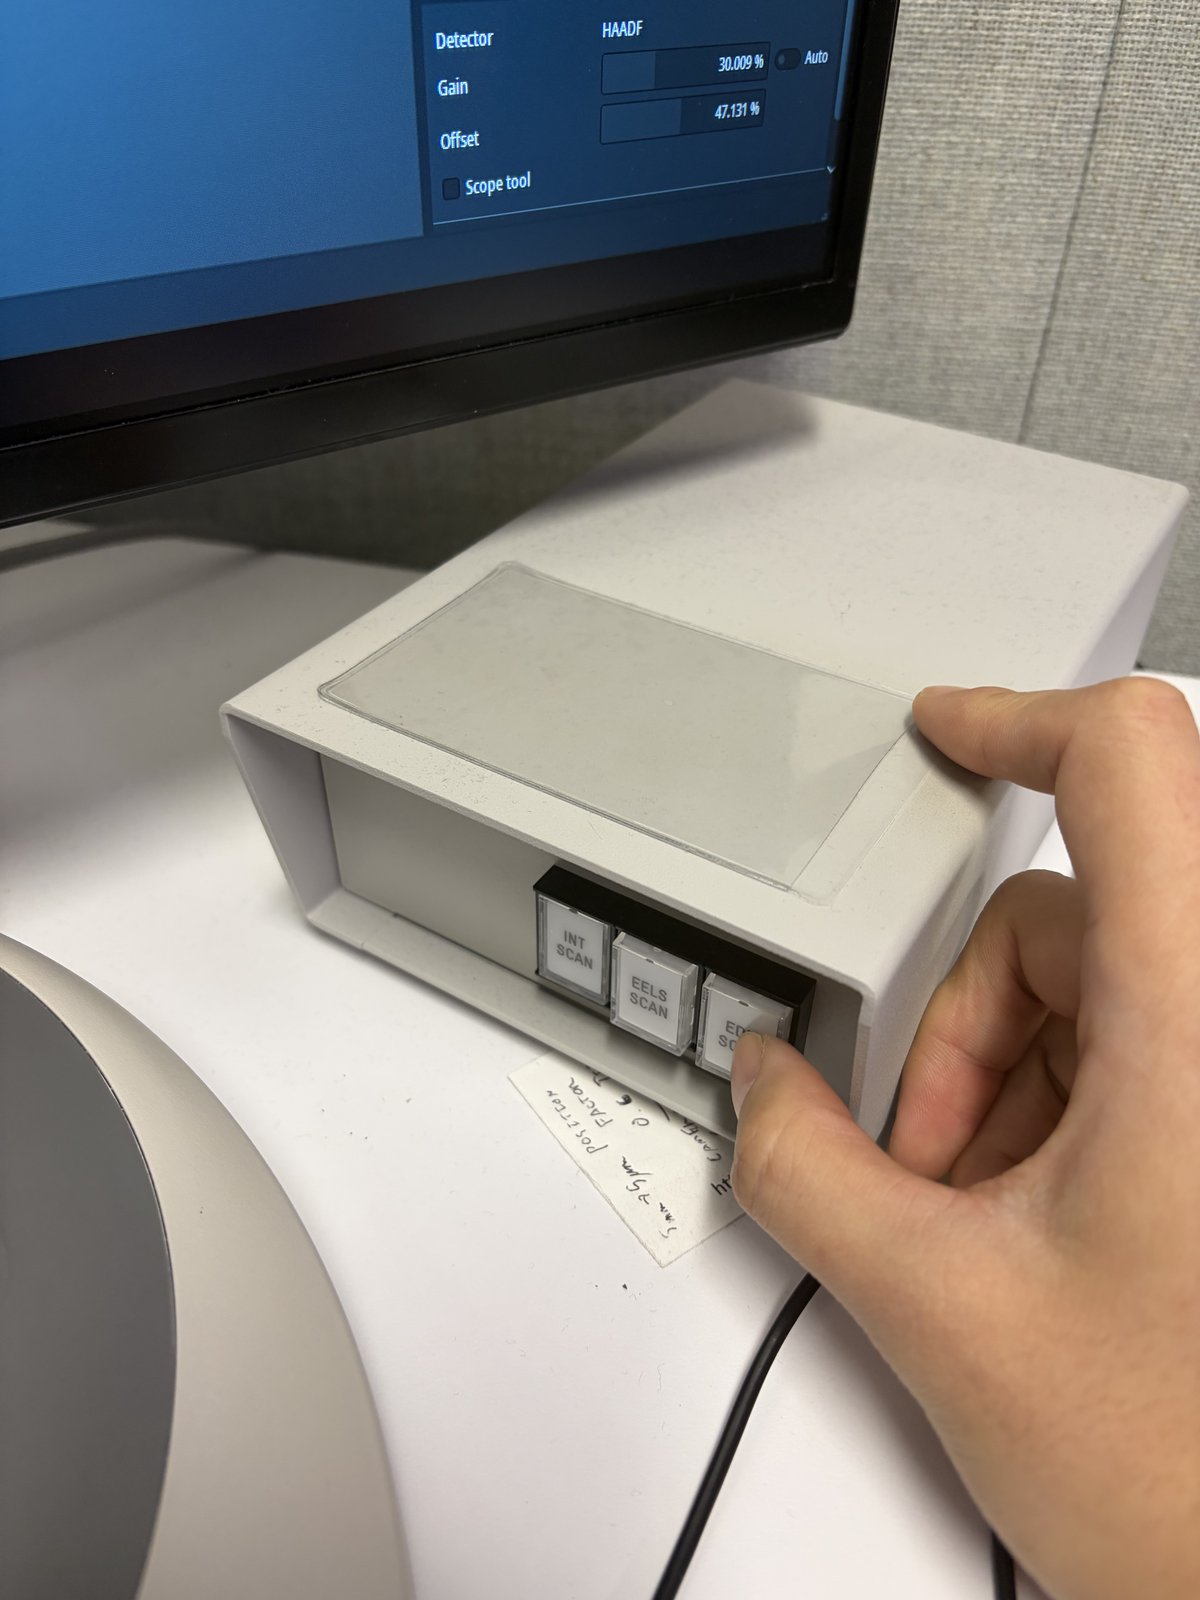
-
Press
R1on the hand panel to lift the fluorescent screen. The Arina detector sits below the screen.
3.2 Acquire data

-
In the NOVENA software, click
Scan, thenContinuousto start a live preview. Verify the central beam is centered on the detector. -
If the beam is off-center, use the
mulXYknobs with diffraction shift to center it. -
Once centered, click
Stop, then clickSingle Scanto acquire and save the dataset. -
After every
Single Scan, verify the dataset was actually saved in the destination folder before starting the next acquisition.NOVENAoccasionally completes a scan without writing the file.-
Confirm both
.h5and_master.h5files are present- Open the destination folder set in Section 1.4 and confirm both files for the latest scan are there.
-
Confirm file sizes are non-zero
- Check the file sizes in the folder. If either file is 0 KB, the save failed and the scan must be re-run.
NOTE: Each scan produces a 4D dataset: a CBED pattern at every pixel in the scan area. File sizes can be large depending on scan resolution and detector binning.
-
3.3 Quick analysis
- In the NOVENA software, use
RebinandReprocessfor a quick check of the acquired data. For detailed analysis, export the data for processing with external software (py4DSTEM, etc.).
3.4 Transfer data to your USB
See how to transfer data to your USB for getting the Arina 4DSTEM datasets and HAADF images off the microscope computers.
Part 4: End session
4.1 Retract the Arina detector
-
On the Arina hand panel, press
Retractto move the detector out of the beam path. The green “Retracted” light confirms the detector is clear.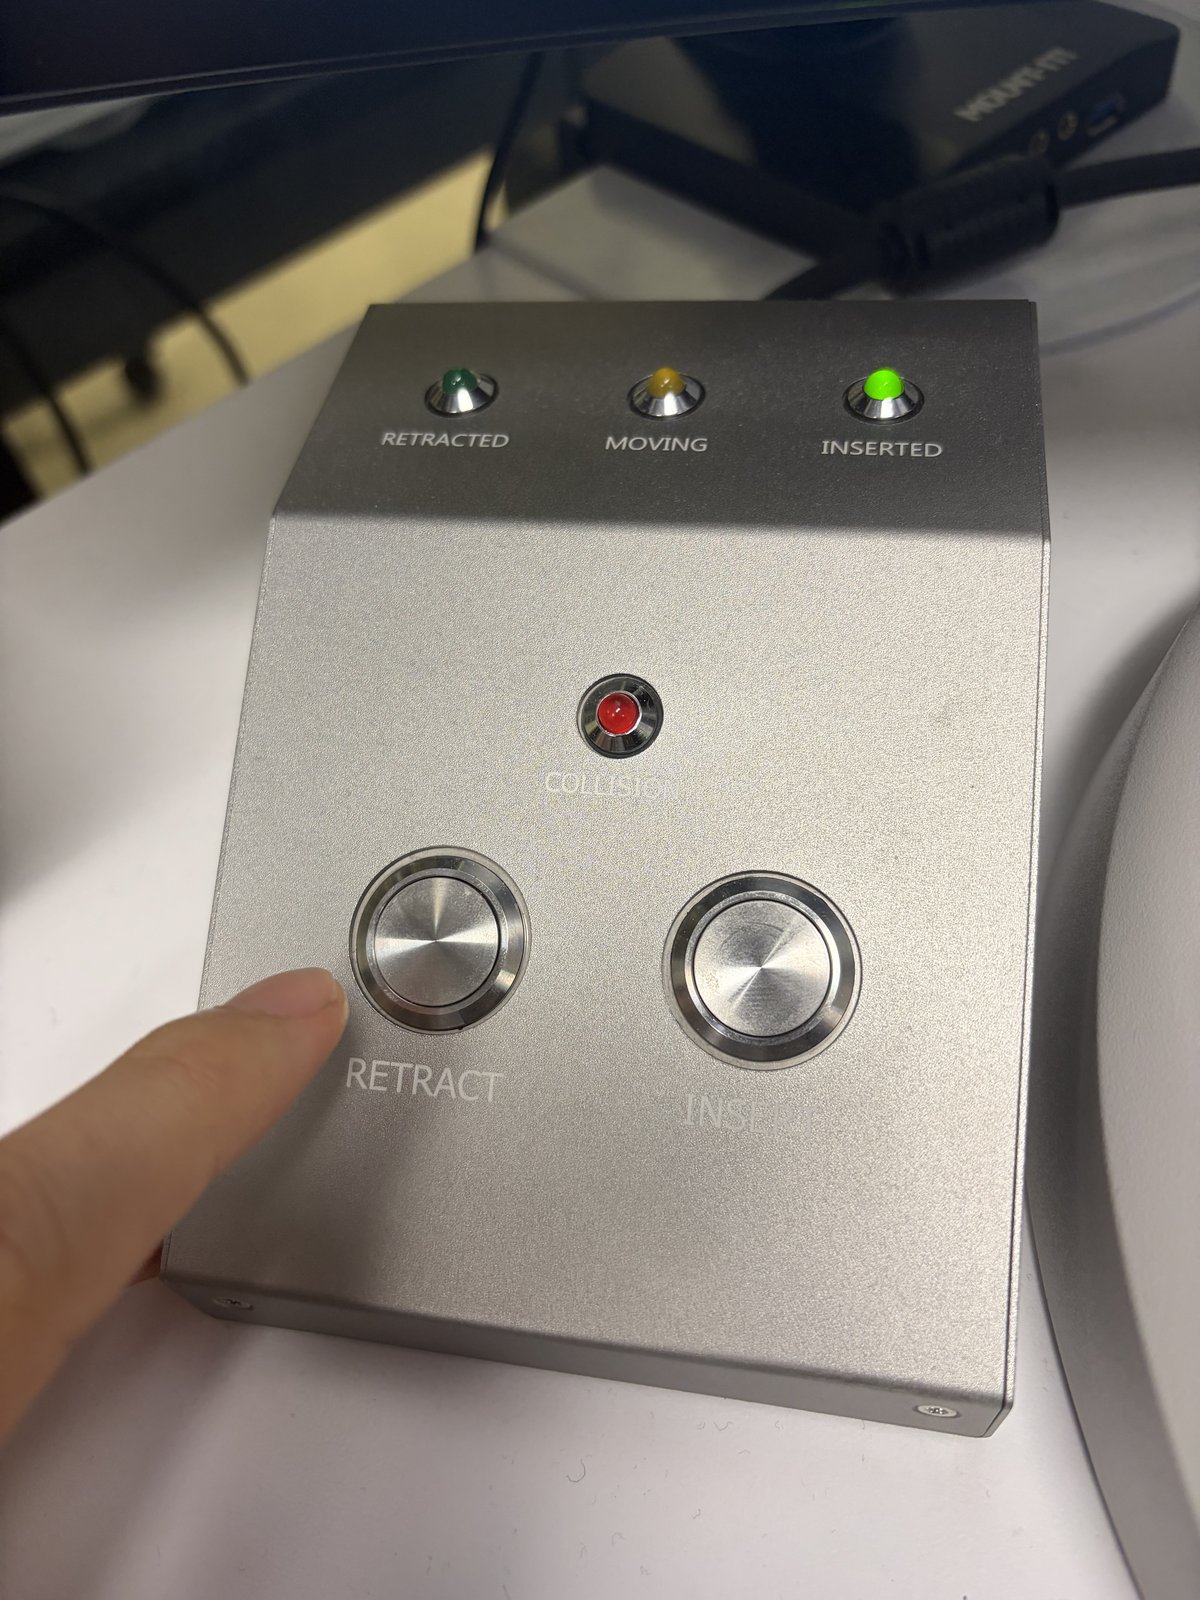
4.2 Power off the detector
- Open the Spectra 300 instrument enclosure.
- Press and hold the button below the Arina detector for 10 seconds. The button releases and the blue indicator light turns off.
4.3 Close session
Follow the steps in End session.
Changelog
- Feb 28, 2026 - Rewrite SOP by Sangjoon Bob Lee with full procedural instructions, inline FAQ dropdowns, and new images
- Dec 10, 2025 - First draft and images shared by Guoliang Hu